
Drawing:oldj_7nsvxk= skull has always been a significant practice in the world of art, not only for its technical challenge but also for its rich symbolism. The skull represents both the fragility and resilience of life, making it a powerful motif in various forms of artistic expression. drawing:oldj_7nsvxk= skull isn’t just about creating a realistic image; it’s about mastering the interplay between light, shadow, and structure to convey a deeper meaning.
For both beginners and seasoned artists, understanding how to draw a skull can be an essential skill. It enhances your grasp of human anatomy and helps improve your overall drawing abilities. Skulls are often used in art to depict themes of mortality, strength, and the passage of time, making them an enduring subject across different cultures and artistic movements. Whether you are looking to add to your portfolio or simply improve your drawing skills, learning how to draw a skull is a valuable pursuit.
Table of Contents
Understanding Skull Anatomy
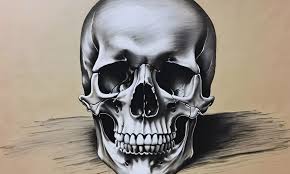
To create a realistic drawing:oldj_7nsvxk= skull, it is vital to understand the anatomy of the skull. The human skull is composed of several bones that fuse together over time, providing structure and support to the head. Key components include the cranium, which houses the brain, and the facial bones, which form the eye sockets, nose, and jaw.
The cranium consists of eight bones, including the frontal bone (forehead), parietal bones (sides and roof), occipital bone (back), and temporal bones (sides). The facial bones include the mandible (lower jaw), maxillae (upper jaw), zygomatic bones (cheekbones), and nasal bones. Understanding the location and relationship between these bones is crucial for accurate depiction.
In addition to the bones, paying attention to the sutures—the joints between the skull bones—is essential. These irregular lines add to the skull’s realism. For artists, having a good reference, such as anatomical models or high-quality images, can be invaluable for studying these details. This foundational knowledge will significantly enhance your drawing accuracy and depth.
Essential Tools and Materials for drawing:oldj_7nsvxk= skull
To draw a detailed and realistic skull, selecting the right tools and materials is essential. High-quality pencils, papers, and erasers can make a significant difference in your artwork. Here are some recommendations:
Pencils:
- Graphite Pencils: Use a range from H (hard) to B (soft) grades to achieve various shades and textures. For example, a 2H pencil is great for light outlines, while a 6B is ideal for deep shadows.
- Colored Pencils: These are useful for adding highlights and depth, especially if you want to create a more stylized look.
Paper:
- Sketch Pads: Medium-textured paper works well for detailed drawings.
- Bristol Board: A heavier, smooth paper excellent for fine details and mixed media.
- Toned Paper: Adds depth and allows you to use white pencils or pastels for highlights.
Erasers:
- Kneaded Erasers: Flexible and can be shaped for precision erasing.
- Rubber Erasers: Great for removing larger areas.
Additional Tools:
- Blending Stumps: For smoothing and blending pencil marks.
- Rulers and Compasses: Helpful for maintaining proportions and symmetry.
Using the right tools not only improves the quality of your drawings but also makes the process more enjoyable and efficient.
Step-by-Step Guide to drawing:oldj_7nsvxk= skull
Creating a detailed drawing:oldj_7nsvxk= skull involves several steps, each building upon the previous one to enhance accuracy and depth. Here’s a step-by-step guide:
1. Outline the Basic Shape:
- Start with an oval shape to represent the cranium.
- Divide the oval into sections to map out the proportions.
- Extend lines downward from the oval to form the mandible (jawline).
2. Mark Key Features:
- Draw guidelines for the eyes, nose, and mouth.
- Sketch large, rounded rectangles or ovals for the eye sockets.
- Create a triangular outline for the nasal cavity.
3. Add Details:
- Define the shape of the eye sockets and nasal cavity.
- Outline the teeth, paying attention to their alignment and size.
- Add sutures to depict the joints between the skull bones.
4. Shading and Texturing:
- Use varying pencil grades to add depth and dimension.
- Apply shading techniques such as hatching, cross-hatching, and blending.
- Create texture by adding small lines and dots to simulate the bone surface.
5. Final Touches:
- Review your drawing and make necessary adjustments.
- Enhance highlights and shadows to add contrast.
- Clean up any stray lines to give your drawing a polished look.
By following these steps, you can create a realistic and detailed drawing:oldj_7nsvxk= skull that captures the intricacies of the human skull.
Advanced Techniques and Artistic Styles
Once you have mastered the basics of drawing:oldj_7nsvxk= skull, you can explore advanced techniques and artistic styles to enhance your artwork. Here are some methods and styles to consider:
1. Mixed Media:
- Combine different materials such as ink, watercolor, and digital tools to add depth and complexity to your drawings.
- Experiment with different combinations to find a style that suits your artistic vision.
2. Dynamic Compositions:
- Instead of drawing a static skull, explore different angles and perspectives to create a sense of movement and energy.
- Play around with the positioning of the skull and other elements to achieve a more engaging composition.
3. Symbolism and Storytelling:
- Incorporate symbolism to convey deeper meanings and narratives.
- Use your drawing to tell a story or explore a theme that resonates with you.
4. Digital Tools:
- Use graphic tablets and programs like Adobe Photoshop, Corel Painter, and Procreate to create detailed and realistic artwork.
- Experiment with different styles and techniques using digital filters, effects, and blending modes.
5. Stylized Art:
- Explore various styles such as cartoon, abstract, and geometric to add a unique touch to your drawings.
- Use exaggerated features, bold lines, and vibrant colors to create a distinct artistic style.
These advanced techniques and artistic styles allow you to push the boundaries of traditional drawing:oldj_7nsvxk= skull, making your artwork more dynamic and innovative.
Common Mistakes and How to Avoid Them
Drawing:oldj_7nsvxk= skull can be challenging, and even experienced artists can make mistakes. Here are some common pitfalls and tips on how to avoid them:
1. Incorrect Proportions:
- Use reference images and guidelines to keep proportions accurate.
- Regularly step back and review your work from a distance to ensure the overall balance.
2. Flat Shading:
- Observe light and shadow carefully to create depth and dimension.
- Practice gradual shading to achieve smooth transitions between light and dark areas.
3. Overworking:
- Know when to stop to avoid muddying details.
- Take breaks and return with fresh eyes to assess your work.
4. Lack of Texture:
- Pay attention to the natural textures of the skull.
- Use small, controlled strokes to add subtle details and avoid over-texturing.
By being aware of these common mistakes and practicing regularly, you can improve your drawing:oldj_7nsvxk= skull skills and achieve better results.
Conclusion
Drawing:oldj_7nsvxk= skull is more than just a technical exercise; it is an exploration of both artistic skill and deep symbolism. The skull has been a powerful symbol in art for centuries, representing themes such as mortality, strength, and transformation. By mastering the art of drawing:oldj_7nsvxk= skull, you not only improve your technical abilities but also connect with a rich artistic tradition.
Whether you are a beginner or an experienced artist, continually practicing and exploring new techniques will help you grow. Remember to study anatomy, use the right tools, and experiment with different styles.
Read More: Vibriance Super C Serum at Target